
What to Do If Your Flooring Gets Water Damage
Water damage is one of the most frustrating problems a homeowner can face — especially when it affects your floors. Whether it’s from a burst pipe, heavy rain, or an overflowing appliance, water can quickly ruin flooring materials and lead to bigger issues like mold, warping, or subfloor damage.
Knowing how to act quickly and correctly can make a huge difference in how much damage is done and how costly the repairs will be. Here’s your step-by-step guide on what to do if your floors have water damage — and when to call in the pros.
Step 1: Identify the Source of the Water
Before you even think about drying things out, you need to stop the water at the source. Was it a broken pipe? A leaky appliance? Flooding from outside? Stopping the water flow is the most important first step.
If it’s plumbing-related, shut off the main water valve. If it’s stormwater, sandbags and a sump pump might help prevent further spread.
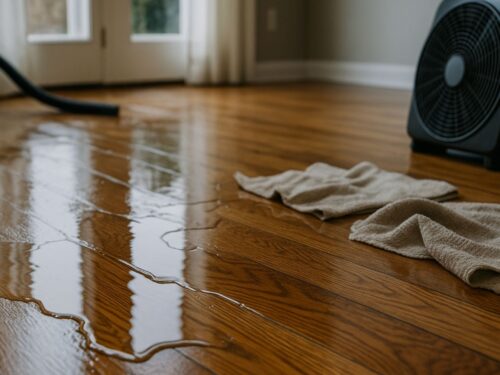
Step 2: Remove Water Immediately
Time is your enemy when it comes to water damage. The longer water sits, the more likely it will soak into the floorboards and subfloor.
- Use towels, mops, or a wet/dry vacuum to soak up as much water as possible.
- Move rugs, furniture, and anything absorbent away from the wet area to prevent more damage.
- If it’s a large spill or flood, you may need professional water extraction equipment to remove water trapped beneath the surface.
Step 3: Dry the Area Thoroughly
Drying the visible water isn’t enough — moisture may still be trapped in the layers of your flooring or subfloor. You’ll need to dry it out fully to prevent mold and structural issues.
Here’s how:
- Open windows and doors for ventilation if weather allows.
- Set up fans and dehumidifiers in the affected area to speed up the drying process.
- If moisture has reached the subfloor, lifting floorboards or planks may be necessary to allow air circulation underneath.
Note: Some damage may not be visible to the naked eye. Moisture meters can help detect hidden moisture in your floors.
Step 4: Inspect the Type of Flooring You Have
Different flooring materials react differently to water. Some are more resilient than others. Here’s what to expect:
Hardwood Flooring
Hardwood tends to warp, cup, or buckle when exposed to moisture. It’s important to act quickly. If only a small area is affected, drying may salvage the planks. Severe damage usually requires removing and replacing individual boards or refinishing the whole area.
Laminate Flooring
Laminate is made of compressed fiberboard and is very prone to swelling when wet. Once it absorbs water, it often can’t be saved. The best move is to remove the affected planks and inspect the subfloor beneath.
Luxury Vinyl Plank (LVP)
Many LVP products are water-resistant or waterproof. However, water can still seep through edges and seams, especially if the subfloor is not waterproof. If planks begin lifting or feel soft underfoot, replacement may be necessary.
Tile Flooring
Tile itself is waterproof, but grout and subfloor may not be. If water has seeped through grout lines, damage could occur below the surface. Remove damaged grout and inspect for subfloor saturation.
Step 5: Check for Mold or Mildew
Anywhere water lingers for more than 24–48 hours, mold may start to grow — especially in humid climates like Texas. Look for:
- Musty smells
- Discoloration or spots
- Soft or spongy spots under the floor
If you suspect mold, it’s time to bring in a professional restoration company. Mold spreads quickly and can be a serious health hazard, especially to children, seniors, or those with respiratory issues.
Step 6: Decide Whether to Repair or Replace
Once the area is fully dried and inspected, you’ll need to decide whether to salvage or replace the flooring.
Factors to consider:
- The extent of the damage
- The material and whether it can be refinished
- Cost of repair vs. full replacement
- Risk of mold or ongoing moisture issues
In some cases, it may make sense to upgrade to more water-resistant materials — especially in kitchens, laundry rooms, or basements.
Step 7: Prevent Future Water Damage
You can’t always control every leak or storm, but there are smart ways to protect your floors going forward:
- Install water sensors near appliances and plumbing-heavy areas
- Use rugs and mats in entryways, bathrooms, and near sinks
- Upgrade to waterproof flooring in at-risk areas
- Maintain plumbing and gutters regularly to reduce the risk of leaks
When to Call in a Professional
If you’re unsure how deep the damage goes or you suspect mold or structural issues, don’t wait. Calling a water restoration specialist early can save time, money, and stress. They have moisture meters, industrial drying equipment, and experience repairing floors safely and effectively.
Trying to DIY water damage cleanup without the right tools can sometimes make things worse — especially if you accidentally trap moisture under your flooring.
Need Help? Walk The Plank Flooring Has Your Back
If your floors are past the point of no return, we’re here to help you choose the best replacement — one that’s stylish, durable, and more water-resistant than your last setup. We offer professional guidance and a wide selection of flooring options that hold up to whatever life (or your washing machine) throws at them.
Contact us today for a free in-home consultation or stop by our showroom. We’ll help you walk away with confidence — and better floors.
Also check out our blog on cleaning myths that could be damaging your floors.